
So here is how you can make one for your kids, grand kids, nieces, nephews and friends!
Trick-or-Treat Bag Tutorial
What you need (in addition to sewing machine, thread, pins etc. . .):
Fabric - 1/2 yard of 2 different fabrics (this is actually more than you need for the size of bag I made, but you might decide to make you bag larger or have other projects you could use the scraps for. Exact dimensions are below.)
Ribbon - gross grain - 1 spool (I used 2- 17 inch pieces for the handle) I also used lots of scrap ribbon to make the little ribbon puff attached to the bag.
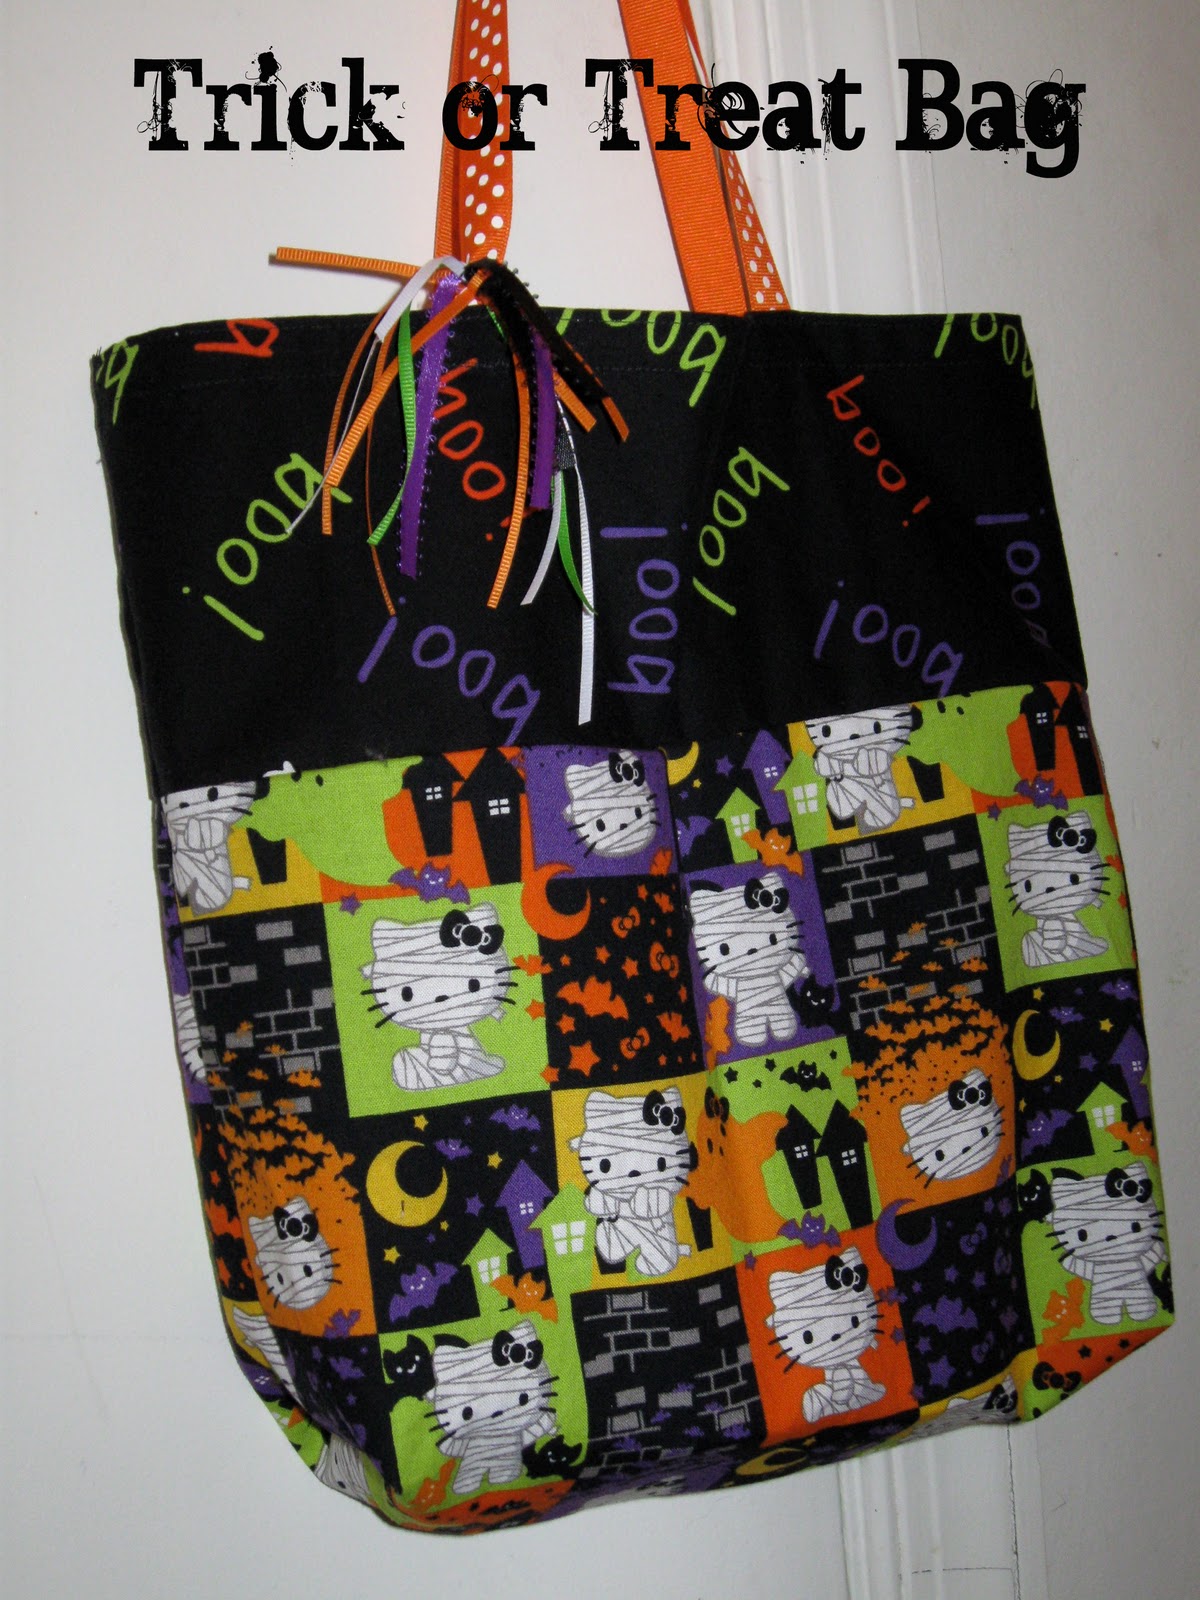
#1 Cut out the pieces of the bag, 2 of each fabric - kitty fabric - 9.5 X 14 inches, Boo fabric - 6.5 X14

#2 Line up and pin right sides together - one of each fabric making sure that if your fabric has a picture that it is going in the right direction. You will have two sets.

#3 Sew the pinned edge with about a 1/4 inch seam. I did double seams for added strength. Do this with both sets.

#4 - Fold the top edge of the bag in a 1/2 inch and then fold another 1/2 inch and pin down. This will be the top seam of your bag.

#5 Lay both sets (sides of bag) on top of each other - right sides together. Now line up your seams - the seams of the connecting fabrics should be lined up first and then check to see that the top of the bag is matching and adjust accordingly. Pin bag in place around the bottom and both sides.

#6 Now sew around the bag on the two sides and bottom. Be sure to secure your threads by back stitching at the ends. I did double seams for added strength.

#7 Cut two 17 inch strips of ribbon. You will need to heat seal the ends by quickly brushing a flame (lighter or candle) across the end. Seems scary, but it just barely melts the end to keep it from fraying. See the difference in the picture.

#8 Line up your ribbon 4 inches from the outside edge of the bag with the right side of the ribbon facing in. Pin in place.

#9 Open the bag and slip it around the arm of the sewing machine. Sew on the seam close to the bottom edge of the fold and then another seam near the top edge of the bag. I backstiched a few times over the ribbon for added strength.


#10 To square off the bag on the bottom grab both side of the bag and pull out. Grab the bottom corner (which is now a triangle shape) and feel with your hands to line up the seams. Measure 2 inches from the corner and pin. (Need help with this step - see it in more detail on another bag I made HERE.) Sew a seam securing the ends. You can cut the extra fabric off if desired.


#11 Turn the bag right side out and you are done!!


Optional String Puff - I just cut small ribbon pieces, tied them together and then used one string to tie them to the handle of the bag. I like how it dresses up the bag a bit and gives it more character.

I hope you have fun make some washable, durable and easy to store bags for Halloween!
Cute! I really need to know where you got the Kitty fabric - my daugher is in LOVE with her and would be so happy!
ReplyDeleteHey Alayna! I found the Hello Kitty fabric at Joanns. My girls are in love with it too.
ReplyDeleteThose kitty mummies are so cute I can't stand it! My daughter would love this (and not just for Halloween) :).
ReplyDeleteWhat a cute bag! Thanks for the tutorial!
ReplyDeleteA-dorable!
ReplyDeletem ^..^
Coming over from New Friend Friday. Great trick or treat bag.
ReplyDeleteHi, Daisha! This is the perfect tutorial! You put so much work into it, great pictures and explanations. Such a cute result! I love the design of your blog, by the way. Visiting from New Friend Friday - have a great weekend!
ReplyDeleteSuch a cute idea! my mom made Halloween bags for us when we were little... It always made me feel special... and I love the hello kitty fabric! :)
ReplyDeleteAwesome I love it! I actually just got fabric last week from joanns to make DD a trick or treat bag. Thanks for this tutorial I didnt even think about using ribbon as a handle :)
ReplyDeleteNew follower found you on "one pretty thing"
http://create-it-fab.blogspot.com/
What a fabulous trick or treat bag! I just linked to it from my holiday site:
ReplyDeletehttp://www.allfreeholidaycrafts.com/Halloween-Candy-Bags/Trick-or-Treat-Tote-Tutorial
Please let me know if it's okay to link to your projects like this in the future.
Thanks!
Rachel @ AllFreeHolidayCrafts